
Multistep forms are common. You’ll see them in onboarding, checkout, quizzes and setup wizards. Each step collects a small part of the full information. Yet implementing them cleanly in React remains a challenge. We developers frequently encounter issues such as:
- State sprawl — managing step state and form data separately.
- Unnecessary rerenders — a change in one step can trigger renders in unrelated components.
- Rigid architecture — Adding validation or dynamic logic often requires major rewrites.
Libraries like Context API, Redux or Zustand are popular choices. But they come with trade-offs like extra setup or unnecessary re-renders. These can get in the way when you just need simple, local state management.
This tutorial provides a simple, practical way to handle multistep forms. No heavy libraries, just React hooks. This custom solution stays clean and efficient.
It keeps logic local, prevents extra re-renders and stays flexible for real-world forms. It’s lightweight yet powerful.
Which State Managers to Avoid for Multistep Forms?
State libraries are great for global state but don’t fit well for form flows. Their global nature adds unnecessary complexity, which can also hurt performance, especially in multistep forms. They can cause extra re-renders across components, slowing things down. Plus, the added boilerplate makes managing simple multistep forms unnecessarily complex.
To address these challenges, a more customized state management solution is necessary. By isolating the state per step, we avoid unnecessary updates across the form. This keeps the form fast, responsive and simple to manage, even in larger applications.
Step 0: Prerequisite
To get started, you must have:
- NodeJs installed
- Basic JavaScript knowledge
- React knowledge
Step 1: Creating the React Project
You must have a React project ready.
If you don’t have a project running, you can create a new TypeScript React project using Vite. It’s recommended for fast build times. Run this command to get started:
npm create vite@latest multistep-form -- --template react-ts
cd multistep-form
npm install
Start the development server to confirm everything works by running the command below:
npm run dev
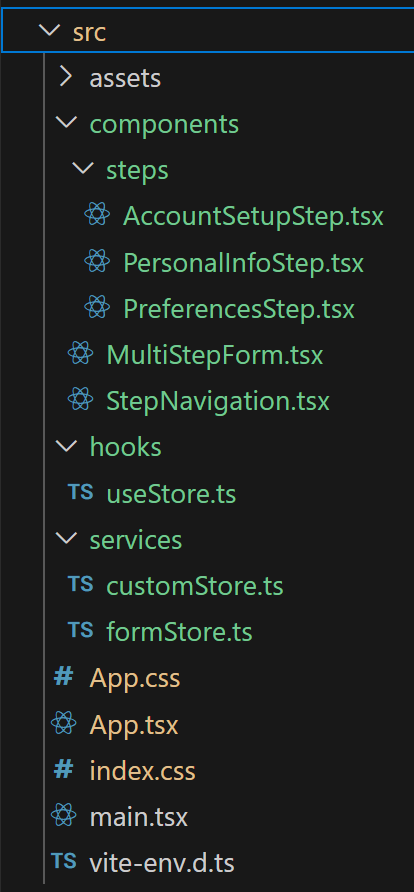
Before creating new files, let’s look at the file structure that we are going to create.
Step 2: Setting Up the Store
Create a new folder in src, name it service and add a new file under it named customStore.ts.
type Subscriber<T> = (state: T) => void;
export type Selector<T, U> = (state: T) => U;

export interface Store<T> {
  getState: () => T;
  subscribers: Set<Subscriber<T>>;
  updateState: (updater: (prevState: T) => T) => void;
  subscribe: <U>(
    selector: Selector<T, U>,
    callback: (selectedState: U) => void
  ) => () => void;
}

export function createStore<T>(initialState: T): Store<T> {
  let state: T = initialState;
  const subscribers = new Set<Subscriber<T>>();

  const getState = () => state;

  const updateState = (updater: (prevState: T) => T) => {
    state = updater(state);
    subscribers.forEach((subscriber) => subscriber(state));
  };

  const subscribe = <U>(
    selector: Selector<T, U>,
    callback: (selectedState: U) => void
  ) => {
    let currentSelectedState = selector(state);

    const subscriber = (newState: T) => {
      const newSelectedState = selector(newState);
      if (newSelectedState !== currentSelectedState) {
        currentSelectedState = newSelectedState;
        callback(newSelectedState);
      }
    };

    subscribers.add(subscriber);
    return () => subscribers.delete(subscriber);
  };

  return { getState, subscribers, updateState, subscribe };
}
This code creates a lightweight state management system to handle global state without using context or third-party libraries. Defining a store that holds the state lets us update it through an updater function and gives access to the current value.
Adding a subscription system with selectors allows components to listen only to the specific slice of state they need. This helps avoid unnecessary re-renders and keeps components efficient. It also makes state management more modular and scalable. Whenever that selected state changes, the corresponding callback is triggered.
The result is a clean, minimal setup that works seamlessly in React environments.
Next, create a new folder in src, calling it hooks for adding useStore.ts in it.
import { useState, useEffect } from "react";
import { Selector, Store } from "../services/customStore";

function useStore<T, U>(store: Store<T>, selector: Selector<T, U>): U {
  const [selectedState, setSelectedState] = useState(() =>
    selector(store.getState())
  );

  useEffect(() => {
    return store.subscribe(selector, setSelectedState);
  }, [store, selector]);

  return selectedState;
}
export { useStore };
In this code, a custom hook called useStore links React components with our custom store. The local state is initialized by using the selector. This extracts only the specific piece of global state needed by the component.
A subscription inside a useEffect listens for changes to the selected state. Whenever the relevant part of the store updates, the component’s state gets updated.
This approach keeps components updated with the store. They only re-render when the specific data they need changes.
Step 3: Creating the Multistep Form
Create a basic user onboarding form with three basic steps as follows:
- Personal information
- Account setup
- Preferences
Step 4: Initializing the Form Store
First, initialize the form state that will hold all the form data. Create a new file in the service folder called formStore.ts.
import { createStore } from "./customStore";

export type FormState = {
  currentStep: number;
  formData: {
    personal: {
      name: string;
      email: string;
    };
    account: {
      username: string;
      password: string;
    };

    preferences: {
      newsletter: boolean;
      notifications: boolean;
    };
  };
  errors: Record<string, string>;
};

const initialState: FormState = {
  currentStep: 1,
  formData: {
    personal: {
      name: "",
      email: "",
    },
    account: {
      username: "",
      password: "",
    },
    preferences: {
      newsletter: true,
      notifications: false,
    },
  },
  errors: {},
};

export const formStore = createStore<FormState>(initialState);
This defined the shape of the form state and set an initial structure with default values. Using createStore makes the store shareable across components.
Step 5: Creating Navigation for a Multistep Form
First, create a new file StepNavigation.tsx in a components folder under the src folder.
import { useStore } from "../hooks/useStore";
import { formStore } from "../services/formStore";

export function StepNavigation() {
  const currentStep = useStore(formStore, (state) => state.currentStep);

  const goToStep = (step: number) => {
    formStore.updateState((state) => ({ ...state, currentStep: step }));
  };

  return (
    <div className="step-navigation">
      {[1, 2, 3].map((step) => (
        <button
          key={step}
          onClick={() => goToStep(step)}
          className={currentStep === step ? "active" : ""}
          disabled={currentStep === step}
        >
          Step {step}
        </button>
      ))}
    </div>
  );
}
This code builds a StepNavigation component. It reads the current step from the form store using the useStore hook. This ensures that the component only re-renders when the current step changes. This approach keeps it efficient and reactive.
It also defined a goToStep function, which updates the store’s currentStepusing updateState. This allows users to jump between steps by clicking the corresponding buttons.
This links UI interactions directly to the shared state. It keeps navigation simple, centralized and in sync with the form.
Step 6: Creating the Forms
Next, start adding steps.
Form 1: Personal Info
Create a new folder called steps and add these step components. The first is PersonalInfoStep.tsx.
import { useState } from "react";
import { useStore } from "../../hooks/useStore";
import { formStore } from "../../services/formStore";

export function PersonalInfoStep() {
  const personalInfo = useStore(formStore,
(state) => state.formData.personal);
  const [formData, setFormData] = useState(personalInfo);

  const handleChange = (e: React.ChangeEvent<HTMLInputElement>) => {
    const { name, value } = e.target;
    setFormData((prev) => ({ ...prev, [name]: value }));
  };

  const handleSubmit = (e: React.FormEvent) => {
    e.preventDefault();
    formStore.updateState((state) => ({
      ...state,
      formData: {
        ...state.formData,
        personal: formData,
      },
      currentStep: 2,
    }));
  };

  return (
    <form onSubmit={handleSubmit}>
      <h2>Personal Information</h2>
      <input
        type="text"
        name="name"
        value={formData.name}
        onChange={handleChange}
        placeholder="Name"
        required
      />

      <input
        name="email"
        type="email"
        value={formData.email}
        onChange={handleChange}
        placeholder="Email"
        required
      />
      <button type="submit">Next</button>
    </form>
  );
}
The custom store hook fetches personal form data and manages local form state. Inputs were controlled, and on submit, its updates the store and moves to the next step.

Form 2: Account Setup
Now create a second step file called AccountSetupStep.tsx.
import { useStore } from "../../hooks/useStore";
import { formStore } from "../../services/formStore";
import { useState } from "react";

export function AccountSetupStep() {
  const accountInfo = useStore(formStore,
(state) => state.formData.account);
  const [formData, setFormData] = useState(accountInfo);

  const handleChange = (e: React.ChangeEvent<HTMLInputElement>) => {
    const { name, value } = e.target;
    setFormData((prev) => ({ ...prev, [name]: value }));
  };

  const handleBack = () => {
    formStore.updateState((state) => ({ ...state, currentStep: 1 }));
  };

  const handleSubmit = (e: React.FormEvent) => {
    e.preventDefault();
    formStore.updateState((state) => ({
      ...state,
      formData: {
        ...state.formData,
        account: formData,
      },
      currentStep: 3,
    }));
  };

  return (
    <form onSubmit={handleSubmit}>
      <h2>Account Setup</h2>

<input
        type="text"
        name="username"
        value={formData.username}
        onChange={handleChange}
        placeholder="Username"
        required
      />
      <input
        name="password"
        type="password"
        value={formData.password}
        onChange={handleChange}
        placeholder="Password"
        required
      />
      <div className="step-nav">
        <button type="button" onClick={handleBack}>
          Back
        </button>
        <button type="submit">Next</button>
      </div>
    </form>
  );
}
The second step is similar to the first, adding a back button for navigation.

Form 3: Preferences
Finally, create the PreferencesStep.tsx component.
import { useStore } from "../../hooks/useStore";
import { formStore } from "../../services/formStore";
import { useState } from "react";

export function PreferencesStep() {
  const preferences = useStore(
    formStore,
    (state) => state.formData.preferences
  );
  const [formData, setFormData] = useState(preferences);

  const handleChange = (e: React.ChangeEvent<HTMLInputElement>) => {

const { name, type, checked, value } = e.target;
    setFormData((prev) => ({
      ...prev,
      [name]: type === "checkbox" ? checked : value,
    }));
  };

  const handleBack = () => {
    formStore.updateState((state) => ({ ...state, currentStep: 2 }));
  };

  const handleSubmit = (e: React.FormEvent) => {
    e.preventDefault();
    formStore.updateState((state) => ({
      ...state,
      formData: {
        ...state.formData,
        preferences: formData,
      },
      currentStep: 3,
    }));
    alert("Form submitted successfully!");
  };

  return (
    <form onSubmit={handleSubmit}>
      <h2>Preferences</h2>
      <label>
        <input
          type="checkbox"
          name="newsletter"
          checked={formData.newsletter}
          onChange={handleChange}
        />
        Subscribe to newsletter
      </label>
      <label>
        <input
          type="checkbox"
          name="notifications"
          checked={formData.notifications}
          onChange={handleChange}
        />

        Enable notifications
      </label>
      <div>
        <label>Theme:</label>
        <label>
          <input
            type="radio"
            name="theme"
            value="light"
            checked={formData.theme === "light"}
            onChange={handleChange}
          />
          Light
        </label>
        <label>
          <input
            type="radio"
            name="theme"
            value="dark"
            checked={formData.theme === "dark"}
            onChange={handleChange}
          />
          Dark
        </label>
      </div>
      <div className="step-nav">
        <button type="button" onClick={handleBack}>
          Back
        </button>
        <button type="submit">Submit</button>
      </div>
    </form>
  );
}
This is the final component. The current preference settings are pulled from the store the stored in local state, making it easier to manage user input.
Then checkboxes and radio buttons reflect and update the preference data. On submission, the changes are pushed back into the store and a success alert displays. A back button allows users to return to the previous step.
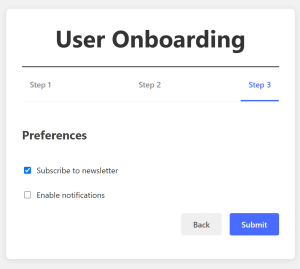
Image showing the third step in the multistep form.
The form is completed. The UI stayed intuitive, and the centralized state is maintained throughout the flow.
Step 7: Bringing Everything Together
Create a new file directly under the components folder called MultiStepForm.tsx.
import { useStore } from "../hooks/useStore";
import { formStore } from "../services/formStore";
import { PersonalInfoStep } from "./steps/PersonalInfoStep";
import { AccountSetupStep } from "./steps/AccountSetupStep";
import { PreferencesStep } from "./steps/PreferencesStep";
import { StepNavigation } from "./StepNavigation";

export function MultiStepForm() {

  const currentStep = useStore(formStore, (state) => state.currentStep);

  return (
    <div className="multi-step-form">
      <StepNavigation />
      <div className="form-container">
        {currentStep === 1 && <PersonalInfoStep />}
        {currentStep === 2 && <AccountSetupStep />}
        {currentStep === 3 && <PreferencesStep />}
      </div>
    </div>
  );
}
MultiStepForm ties everything together, reading the current step from the store. Based on this, it renders the corresponding step component.
Adding StepNavigation at the top allows quick switching between steps. Everything stays in sync through the shared store.
Finally, update App.tsx to see it work.
import "./App.css";

import { MultiStepForm } from "./components/MultiStepForm";

function App() {
  return (
    <>
      <MultiStepForm />
    </>
  );
}

export default App;
Performance Considerations and Key Benefits
Let’s examine why this custom solution outperforms traditional approaches:
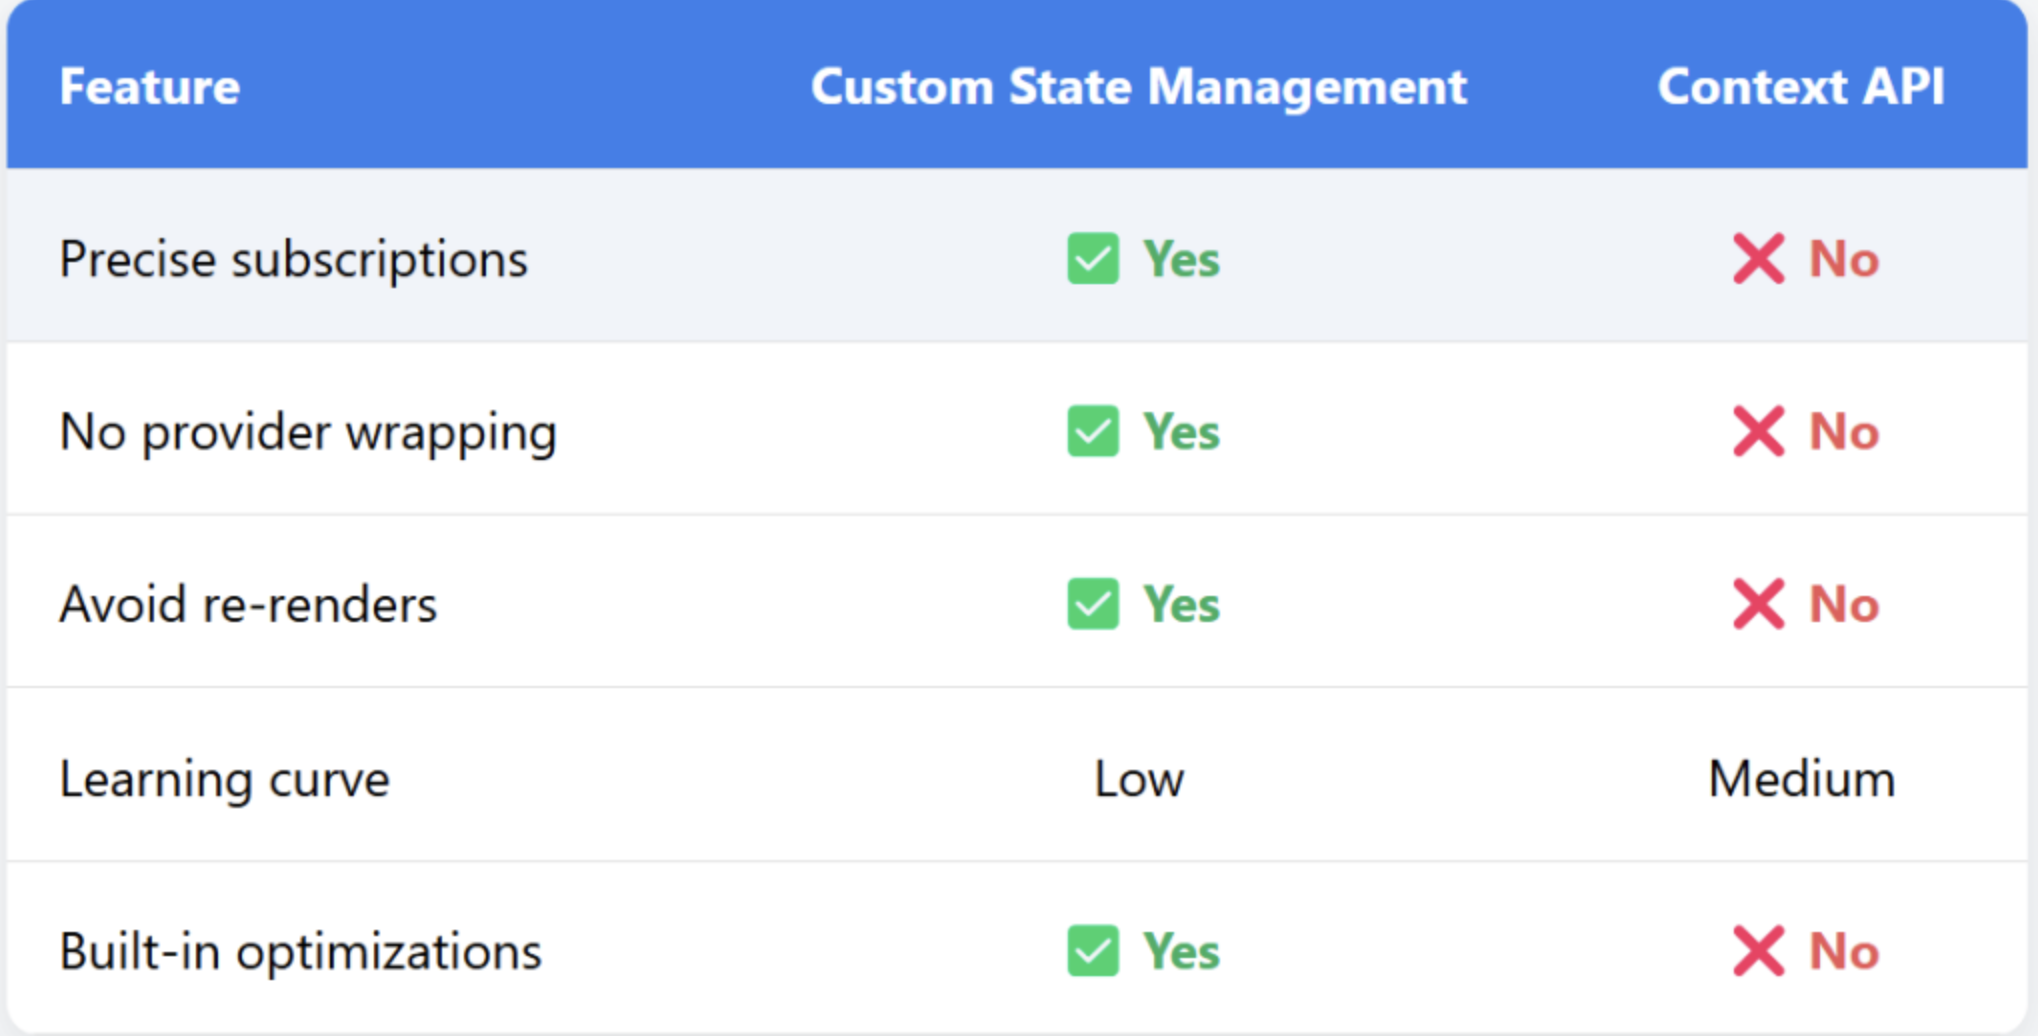
- Granular reactivity: Context API triggers re-renders in all components that consume the state. In contrast, selector-based subscriptions update only the components that need to change. This is especially useful in multistep forms, where each step handles separate data.
- Zero dependency architecture: Relying on React hooks and basic JavaScript avoids extra libraries. The entire solution is under 2KB, much smaller than the 10KB+ size of most state libraries.
- Type safety by design: TheTypeScript setup ensures strong type inference. Selectors automatically pass types to components. This catches errors at compile time when accessing store properties.
- Progressive enhancement: Need persistence? Add a middleware layer to sync with
localStorage. Require undo/redo? Implement a state history buffer. The minimal core makes these extensions straightforward.
Final Implementation Notes
For production use, you might want to:
- Add store persistence (such as to
- localStorage
- )
- Implement middleware for logging or validation
- Create helper hooks like
useStoreActionsfor common mutations - Add the batch updates for complex state transitions
These enhancements can be added incrementally without refactoring existing components.
That’s it! With this approach, you can create a customized multistep form. It also ensures efficient store management for better performance.
Conclusion
This state management approach hits that sweet spot between keeping things simple and having enough horsepower when you need it. It’s perfect for those medium-complexity projects, such as those multistep forms that always seem to get unwieldy.
I love that it ditches all the Context API boilerplate that used to drive me crazy. The performance boost is noticeable too, and it just makes the development process much less painful.
I’ve found it works especially well for:
- Multistep forms that tend to grow out of control
- Those wizard interfaces where users step through a process
- Settings screens with interconnected options
- Really any situation where different components need their own slice of the state pie.
Give it a try on your next project; it’s lightweight, performs well, and won’t turn your code base into spaghetti as you scale up.