Kotlin Multiplatform (KMP) enables developers to gradually adopt shared features for cross-platform projects, without having to completely overhaul the existing codebase. This technology’s flexibility and versatility make KMP an exceptional, thoughtfully designed framework.
If you’re new to the Kotlin Multiplatform framework, Get Started with Kotlin Multiplatform is an invaluable resource.
In specific scenarios, especially when building shared features in KMP projects, a need arises to implement particular dependencies in KMP targets. Consider, for example, a scenario where a KMP or Compose Multiplatform application targets Android and iOS platforms. There are a few options if you need a particular dependency for both platforms. On Android, you can add the Android dependency, as you would in a typical Android application, but on iOS, you have several options:
- Check if the iOS dependency is part of the prebuilt platform libraries in Kotlin Multiplatform projects in the Kotlin Native libraries (e.g., Core Foundation, Core Data, Cloud Kit). In this case, no additional configuration is required; read Adding iOS Dependencies for more information.
- Integrate with Kotlin’s CocoaPods dependency manager, then import and call the pod dependencies directly from your Kotlin code — this is recommended according to the Kotlin docs. When using this method, note that Kotlin supports interoperability with Objective-C dependencies and Swift dependencies only if their APIs are exported to Objective-C with the @objc attribute. Pure Swift dependencies or Swift pods are not yet supported. While you could download the library directly and add it to your source set, I don’t recommend that option. That said, using CocoaPods is an excellent option, and there are many articles and posts covering it that you can find with a simple internet search. Using CocoaPods along with checking the Kotlin libraries for dependencies enables you to leverage expected/actual implementations or the dependency injection (DI) framework to utilize iOS dependencies.
- Using platform-specific APIs through a shared interface implemented in both Kotlin and Swift is often relevant for existing third-party libraries. These APIs are passed from the target platform’s modules into the shared module. The official Kotlin documentation advises checking for a Multiplatform library alternative before using platform-specific APIs. This is sound advice, and I strongly recommend exploring the kmp-awesome repository to search for suitable Multiplatform libraries. However, given that Kotlin Multiplatform is still evolving, many libraries lack an official or recommended KMP version or a reliable alternative with guaranteed long-term support. These scenarios prompt the need to discuss implementing shared platform components in a KMP project and provisioning and implementing platform-specific APIs, as I’ll explore in this article series.
This article series also covers:
- How to create an
ApplicationComponentto use as a bridge for passing components between target (platform) modules and the shared module. - How to use Koin as a DI library to inject these components.
- How to implement a simple network listener on Android and iOS for a KMP project.
To help guide you, I have created a video to showcase the result of your work.
Getting Started: Introducing the ApplicationComponent
The term ApplicationComponent refers to a class designed with properties that can be implemented or utilized by either the Android or iOS platform. The naming and concept were inspired by the structure used in Chris Banes’ Tivi app repository on GitHub.
To kick things off, initiate a new project with the Kotlin Multiplatform Wizard. If you are unfamiliar with Kotlin Multiplatform’s folder structure or project layout, read The Basics of Kotlin Multiplatform Project Structure first to learn how a KMP application is organized and the purpose of each component.
This example sets up a Compose Multiplatform project. Each platform will have its bespoke component: AndroidApplicationComponent for Android and iOSApplicationComponent for iOS.
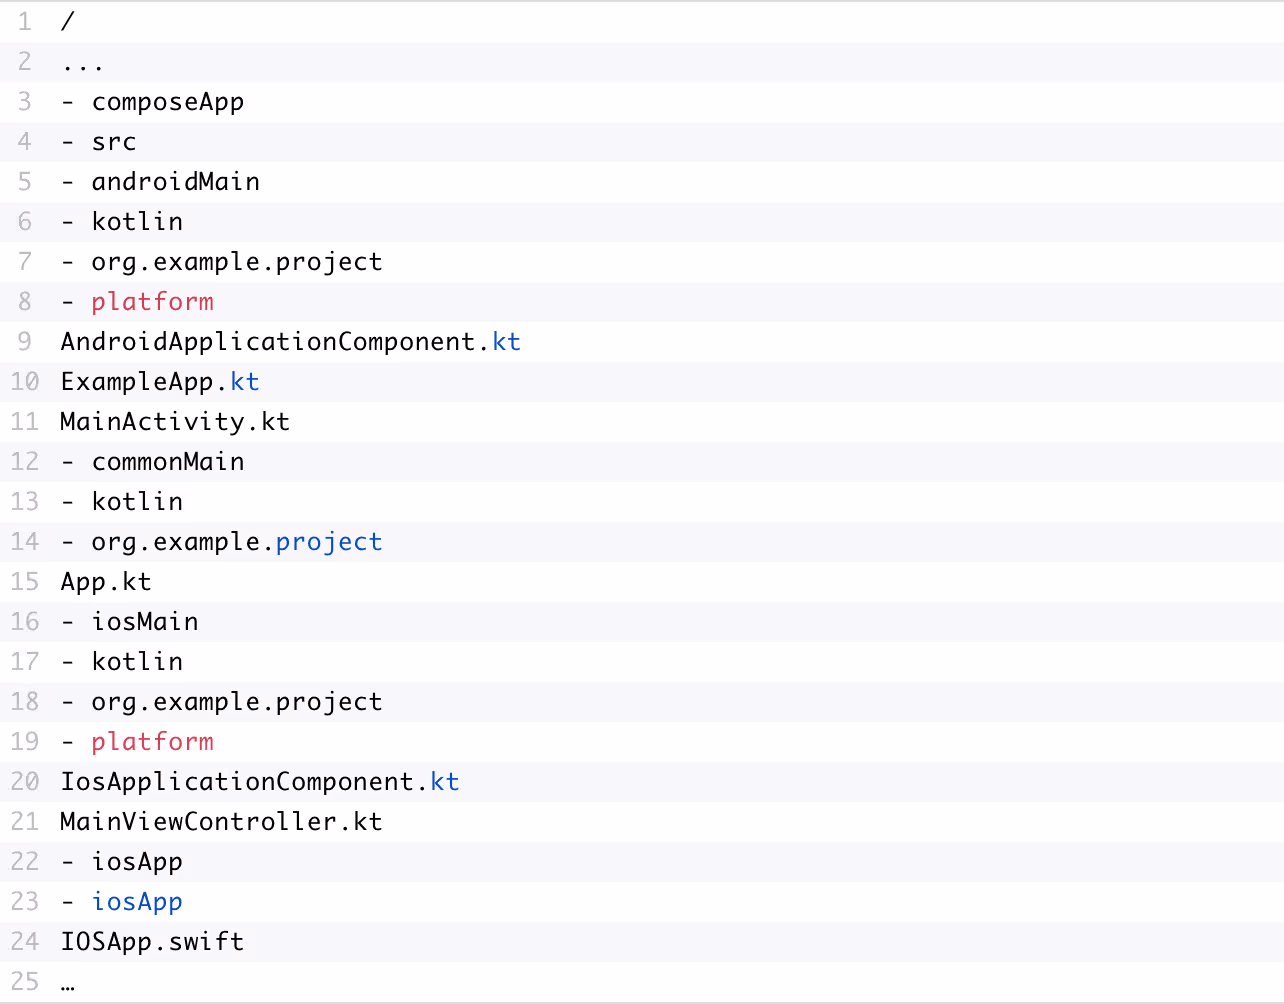
After creation, your project’s architecture will be organized as follows:

Begin with the composeApp module. Within the androidMain and iosMain source sets, create a new directory or package named platform. In this location, define your ApplicationComponent classes. In the same file, implement a function named application that will accept the respective ApplicationComponent as its argument.
// AndroidApplicationComponent.kt (In androidMain)
package org.example.project.platform

class AndroidApplicationComponent

fun application(component: AndroidApplicationComponent) {
   // TODO: Initialization logic with android components
}

...

// IosApplicationComponent.kt (In iosMain)
package org.example.project.platform

class IosApplicationComponent

fun application(component: IosApplicationComponent) {
   // TODO: Initialization logic with ios components
}
You’ve laid the groundwork; now it’s time to set up the entry point in each source to initialize each component. Begin with the androidMain source set. Here, create an Application class named ExampleApp. Make sure to declare this class in your AndroidManifest.xml. Then, emulating the conventions in the JetBrains (JB) documentation, invoke the application function you previously defined.
Here’s how it’s done:
package org.example.project

import android.app.Application
import org.example.project.platform.*

class ExampleApp : Application() {
override fun onCreate() {
super.onCreate()
application(AndroidApplicationComponent())
}
}
The entry point to the iOS application can be accessed through the iOSApp directory. Simply search for the IOSApp.swift file and make these changes:
import SwiftUI
import composeApp

@main
struct iOSApp: App {
init() {
application(IosApplicationComponent())
}

var body: some Scene { ... }
}
And there you have it — a platform bridge that can transfer components from various platforms into your shared module. Typically, these components could be shared interfaces with platform-specific implementations or particular platform-specific dependencies, like UserDefaults on iOS or the Android Application class. It’s worth noting that this architecture will slightly change once you incorporate DI.
To cap it off, here’s a snapshot of how the project structure appears after implementing these modifications:
NOTE: Given that the Compose UI is shared between both platforms, the androidApp module isn’t included, allowing you to establish all Android-specific dependencies directly within the androidMain source set via DI. As a result, for the scope of this article, I won’t be utilizing the AndroidApplicationComponent. However, this component may still be relevant in different contexts, such as incrementally integrating KMP in projects with distinct user interfaces (UIs) for each platform.
Dependency Injection: Using Koin to Aid Component Injection
As you scale up and the component count increases, streamlining dependency provision becomes essential, and this is where the Koin DI framework enters the picture. If you’re not familiar with Koin or are transitioning from Dagger, Hilt or another DI framework, I strongly suggest perusing the Koin official documentation for comprehensive tutorials and guides.
Koin DI centralizes the initialization of your components within the platformModule. The setup is straightforward — simply adhere to the steps provided by the JB team. I’ll delve deeper into this process in the second article in this series, when I explain how to integrate your first dependency.
To kickstart Koin in your project, begin in the commonMain source set by creating a new package named di. Then proceed with the following setup:
// CommonModule.kt
package org.example.project.di

import org.koin.dsl.module

val commonModule = module { }

// PlatformModule.kt
package org.example.project.di

import org.koin.core.module.Module

expect val platformModule: Module

// PlatformModule.android.kt and PlatformModule.ios.kt
actual val platformModule = module { }
// KoinInit.kt (We'll use this to initialize Koin)
package org.example.project.di

import org.koin.core.context.startKoin
import org.koin.core.module.Module
import org.koin.dsl.KoinAppDeclaration

fun initKoin(
additionalModules: List<Module> = listOf(),
appDeclaration: KoinAppDeclaration = {},
) {
startKoin {
appDeclaration()
modules(
additionalModules +
listOf(
commonModule,
platformModule,
)
)
}
}
With the foundation now set, you can use Koin across different platforms.
First and foremost, it’s crucial to ensure that the ApplicationComponents for both platforms are correctly injected into their respective dependency graphs. This approach guarantees that you can consistently access any additional components linked to them. For the sake of organization, I prefer to separate the initialization process; thus, I’ll create KoinInit.android.ktand KoinInit.ios.kt files. This step, while not mandatory — especially in the androidMain source set — is more about personal coding style and preference.
Next, return to your ExampleApp.kt file in the Android project and initiate Koin. The setup should look something like this:
// KoinInit.android.kt
package org.example.project.di

import org.example.project.platform.AndroidApplicationComponent
import org.koin.dsl.KoinAppDeclaration
import org.koin.dsl.module

fun initKoinAndroid(
appComponent: AndroidApplicationComponent,
appDeclaration: KoinAppDeclaration = {},
) {
initKoin(
listOf(module { single { appComponent } }),
appDeclaration,
)
}
// ExampleApp.kt
// ...
class ExampleApp : Application() {

override fun onCreate() {
super.onCreate()

initKoinAndroid(
appComponent = AndroidApplicationComponent()
) {
androidContext(this@ExampleApp)
}
}
}
// …
And voilà, that’s all there is to it! With these steps, the AndroidApplicationComponent is now integrated into the DI graph. The process for iOS follows a similar pattern. On the iOS side, you’ll employ another method to supply additional modules from the iosApp module through the IosApplicationComponent. This method, initKoinIos, will essentially add the IosApplicationComponent as an extra module exclusively for the iOS shared source set.
// KoinInit.ios.kt
package org.example.project.di

import org.example.project.platform.IosApplicationComponent
import org.koin.dsl.module

fun initKoinIos(appComponent: IosApplicationComponent) {
initKoin(
listOf(module { single { appComponent } })
)
}
Utilize it in your Swift code like this:
// iOSApp.swift
import SwiftUI
import composeApp

@main
struct iOSApp: App {
init() {
KoinInit_iosKt.doInitKoinIos(
appComponent: IosApplicationComponent()
)
}

var body: some Scene {...}
}
Now you have laid the foundation for Kotlin Multiplatform. In the second part of this series, I’ll explain how to utilize these components, particularly the IosApplicationComponent, to implement a simple network listener on Android and iOS.
The shift towards remote and borderless hiring enables companies to look beyond geographical constraints to access global talent. Explore strategies to build high-performing, globally distributed teams by downloading The Future of Hiring Is Borderless.
About the author
Mofe Ejegi
Mofe Ejegi is a software engineer with a primary focus on mobile development. He is based in Delta state, Nigeria, and is a member of the Andela Talent Network, a private global marketplace for digital talent. He currently works as a Senior Android engineer at Banque Misr where he demonstrates his strong background in FinTech. On the side, he actively participates in the official Kotlin community on Slack, mostly researching the latest developments in the Kotlin and Android ecosystem, particularly on Kotlin Multiplatform.